
There are two steps to follow in order to add your iManage Cloud connector
Step 1 - Add the App in iManage Control Center
- Log into your instance of Cloud iManage as an NRT Admin
- Navigate to the Control Center
- Navigate to Settings -> Applications on the lefthand navigation bar
- Click the "Add Application" button on the top right
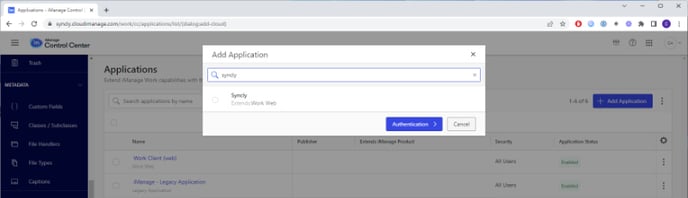
- Search for Syncly and click "Authentication" at the bottom of the modal window
- Authentication
- Accept the default settings

- Accept the default settings
- Access
- Either select "all users" or "Custom"
- This is important, what you select here will dictate which users are able to authenticate the iManage Connector within the Syncly Webapp.
- Settings
- Enter the URL for your Syncly WebApp. Syncly will have provided you with this, though generally it will be your company domain name followed by syncly.io e.g lawfirm.syncly.io
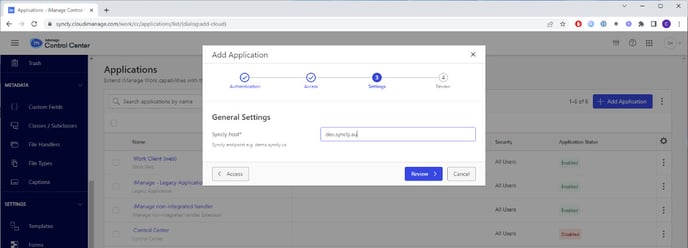
- Enter the URL for your Syncly WebApp. Syncly will have provided you with this, though generally it will be your company domain name followed by syncly.io e.g lawfirm.syncly.io
- Review and save your Application
Step 2 - Add the iManage Cloud Connector in Syncly
- Open a new tab or window in your browser and navigate to your instance of Syncly
- Navigate to the "Connectors" module on the left hand bar
- On the far right, you should see an option for "Available Connectors". If you do not see this section, it may be because you have not been given the "Connector Admin" role within your IdP (See here for more help on this)

- Click the ➕ button next to the iManage Cloud connector (note, there are two versions, make sure you click the one that is labeled "iManage Cloud".
- The connector will automatically be added with no further questions
- You must now Authorise the connector in order to use it
Note: Once a connector is added, it is made available for all other users to see in their list. Importantly, every individual user must run through the authorisation process the first time they log in before they can use it in a Workflow
To understand the Authorisation process, please refer to the user guide here